Unlocking Golden Perfection: The Secret to Crispy Beer Batter for Halibut, Cod, or Chicken Tenders
There's something truly magical about biting into a piece of perfectly fried fish or chicken: that satisfying *crunch* of a golden, airy crust giving way to tender, succulent protein. While many aspire to achieve this restaurant-quality perfection at home, the secret often lies in a deceptively simple yet powerful technique: the beer batter. Forget complicated recipes or special equipment; with the right approach, you can create a crispy, flavorful coating that elevates everything from delicate halibut to robust cod and even kid-favorite chicken tenders. This guide will walk you through the science, technique, and versatility of mastering homemade crispy beer batter, ensuring your next meal is nothing short of extraordinary.
Whether you're a seasoned chef or a kitchen novice, preparing homemade
Mastering Pan-Fried Beer Battered Halibut: Tips for Crispy Fish is far easier than you might imagine. It’s a wonderful alternative to oven-baked or air-fried options when you're craving that classic, deep-fried texture. The beauty of this recipe isn't just its incredible taste, but its adaptability. While we'll often refer to the exquisite qualities of beer battered halibut, rest assured that the very same principles apply beautifully to a range of other proteins, making it a versatile staple for any dinner table.
The Alchemy of a Perfect Beer Batter: Science and Sizzle
The secret to that coveted crispiness isn't just about frying; it's intricately woven into the batter itself. A well-made beer batter is a marvel of culinary engineering, leveraging specific ingredients to create a light, ethereal crust.
*
The Base: Flour and Seasonings
Your journey begins with a blend of all-purpose flour, acting as the structural foundation. To this, a careful selection of seasonings is added:
*
Salt: Essential for flavor enhancement.
*
Paprika: Contributes a subtle warmth and beautiful golden hue.
*
Black Pepper: Adds a gentle kick.
*
Granulated Garlic: Infuses a savory depth without the moisture of fresh garlic.
These dry ingredients create an initial layer of flavor and help the wet batter adhere more effectively, maximizing crispness.
*
The Carbonation Catalyst: Beer (or Alternatives)
This is where the "beer" in beer batter comes into play, but it's not just about the flavor. The magic lies in the carbonation. As the batter hits the hot oil, the bubbles of carbon dioxide rapidly expand and escape, creating tiny pockets of air within the coating. This process is what yields that incredibly light, airy, and crispy texture.
*
Cold is Key: Whether using beer or a non-alcoholic alternative, ensuring your liquid is ice-cold is paramount. The extreme temperature difference between the cold batter and the hot oil creates a thermal shock, which helps the batter set quickly and minimizes oil absorption, leading to a crisper, less greasy result.
*
Consistency Control: The thickness of your batter is subjective and affects the final coating. For a substantial, thicker crust, add less liquid. For a lighter, more delicate and fluffy coat, incorporate a bit more. Aim for a consistency akin to pancake batter – thick enough to cling but thin enough to drip smoothly.
*
Alcohol-Free Options: If you prefer to avoid alcohol, don't despair! Any carbonated beverage will work beautifully. Club soda is an excellent choice as it's flavorless, allowing the natural taste of your chosen protein to shine. Sparkling water or even a light-colored soda can also be used, though they might impart a slight sweetness.
*
The Golden Rule: Dry Food, Hot Oil
No matter how perfect your batter, two fundamental rules guarantee success:
1.
Dry Your Protein: Moisture is the enemy of crispiness. Before dredging and battering, thoroughly pat your fish fillets or chicken tenders dry with paper towels. Any residual water will prevent the batter from adhering properly, causing it to slide off and result in a soggy, inconsistent crust.
2.
Ideal Frying Oil: The best oils for frying are those with a high smoke point and a neutral flavor. Vegetable oil, canola oil, or peanut oil are excellent choices. They won't impart an undesirable aftertaste and can withstand the high temperatures required for frying.
Choosing Your Canvas: Halibut, Cod, or Chicken Tenders?
One of the greatest joys of beer batter is its incredible versatility. While "beer battered halibut" is often lauded as the gold standard, this technique shines equally brightly with other proteins.
*
Beer Battered Halibut: The Premium Choice
Halibut is a firm, flaky white fish with a delicate, sweet flavor that truly sings when encased in a crispy beer batter. Its robust texture holds up beautifully to frying, resulting in tender, moist fish with every bite. It’s an ideal choice for a special occasion or when you want to truly indulge.
*
Crispy Beer Battered Cod: The Classic Comfort
Cod is a perennial favorite for fish and chips, and for good reason. It’s flaky, mild, and readily available, often at a more accessible price point than halibut. The beer batter transforms cod into a comforting, golden-brown masterpiece, making it an excellent choice for a weeknight dinner or a crowd-pleasing gathering. Other white fish like tilapia or even catfish can also be used with fantastic results, offering similar mild flavors and flaky textures.
*
Beer Batter Chicken Tenders: A Kid-Friendly Twist
If you're catering to a discerning palate or simply want a non-seafood option, the same beer batter recipe works wonders for chicken tenders. The crispy coating provides a familiar and delicious crunch, making it an instant hit with children and adults alike. It's a fantastic way to introduce the joy of homemade fried foods in a universally loved format. For more inspiration on adapting this technique, you can even explore recipes for tempura chicken nuggets or deep-fried chicken wings using a similar batter principle.
*
Preparation Matters:
*
Thawing Fish: If using frozen fish, ensure it's completely thawed before proceeding. The best methods are overnight in the refrigerator or submerged in a sealed bag in cool water for about an hour. Never attempt to fry fish directly from frozen, as it will cook unevenly and release too much moisture.
*
Portioning: For fish, slice fillets into manageable, uniform pieces, about 1-inch thick, to ensure even cooking. Chicken tenders are usually ready to go, but you might cut larger pieces into smaller, nugget-sized portions for kids. Remember, regardless of your choice, the crucial step is to *thoroughly pat them dry* with paper towels before seasoning and battering.
Mastering the Fry: Achieving Golden Crispy Perfection
The final step in your crispy journey is the frying itself. Precision here ensures a perfectly cooked interior and that irresistible golden crunch.
1.
Preheat Your Oil: Pour your chosen frying oil into a heavy-bottomed skillet or a deep fryer. The ideal temperature for frying beer-battered foods is between 350-375°F (175-190°C). Use a kitchen thermometer to monitor this closely. Oil that isn't hot enough will result in a greasy, soggy product, while oil that's too hot will burn the batter before the interior cooks through. When the cold batter hits the hot oil, it should sizzle immediately, indicating the correct temperature, but it shouldn't splatter excessively.
2.
The Dredge and Dip:
* First, lightly dredge your thoroughly dried fish or chicken pieces in the seasoned flour mixture. This helps create a foundation for the wet batter to cling to.
* Next, dip each piece into your prepared cold beer batter, allowing any excess to drip off. You want an even, thin coating.
3.
Frying Technique:
* Carefully place the battered pieces into the hot oil, working in batches to avoid overcrowding the pan. Overcrowding will drop the oil temperature too significantly, leading to less crispy results.
* Fry for approximately 3-5 minutes per side, or until the batter is a deep golden brown and audibly crispy. For fish, the interior should be opaque and flake easily with a fork. Chicken tenders should reach an internal temperature of 165°F (74°C).
* Flip the pieces gently once the first side is golden.
* For more detailed guidance on achieving the perfect crisp, you can refer to our article on
Achieve Perfect Beer Battered Halibut: From Dry Fish to Hot Oil.
4.
Draining: Once cooked, transfer the fried pieces to a wire rack set over a baking sheet lined with paper towels. This allows excess oil to drain away, preventing the bottom from becoming soggy and maintaining crispness. A light sprinkle of salt immediately after frying enhances flavor.
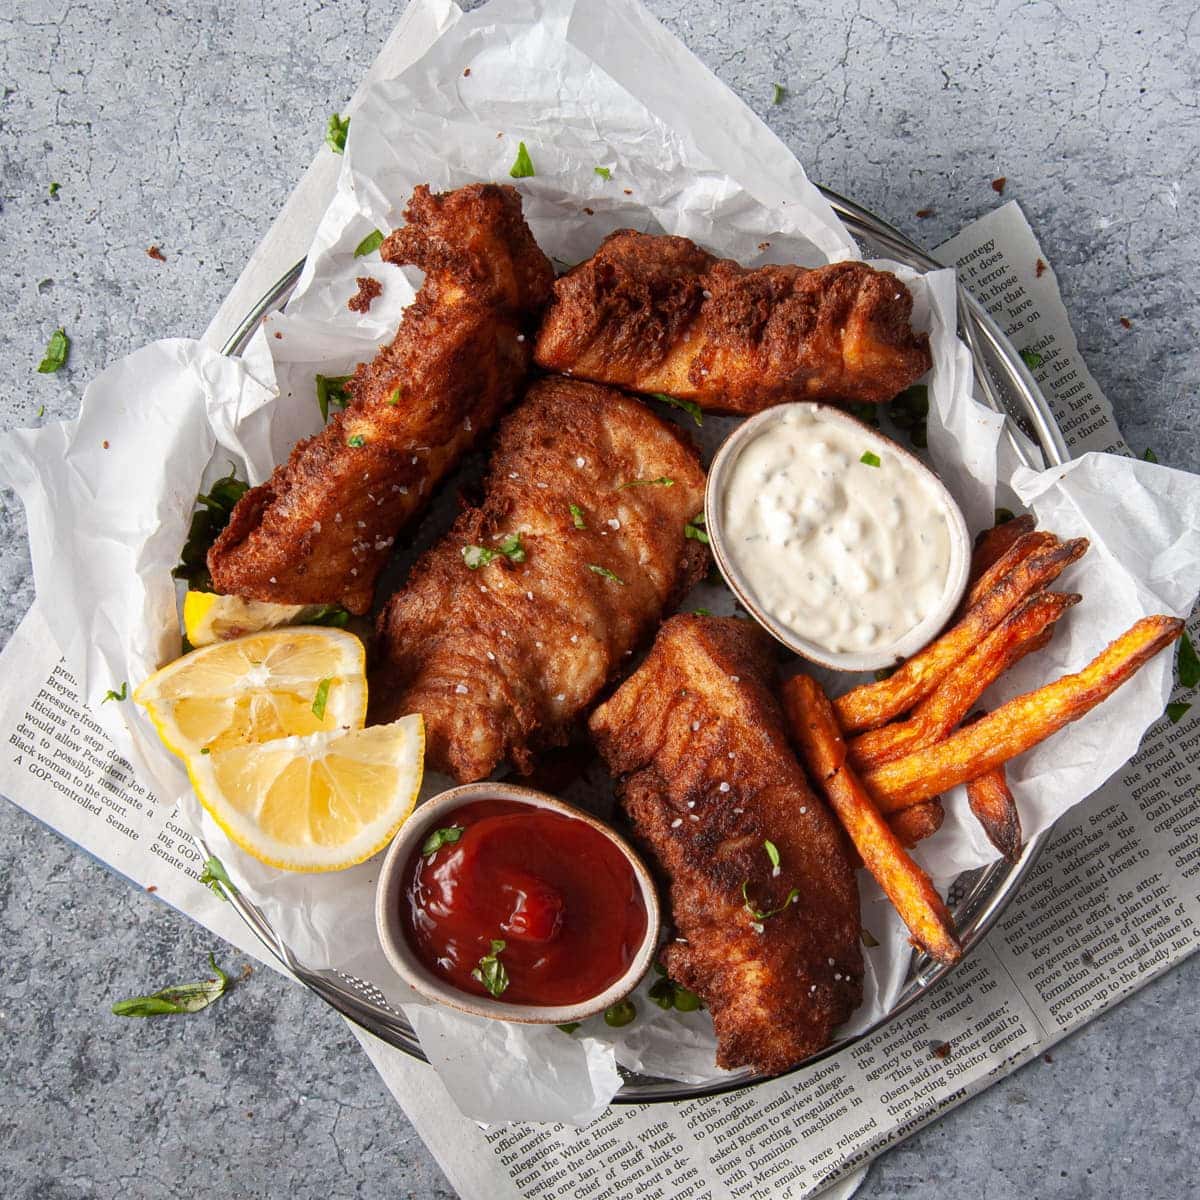
Elevating Your Dish: Serving Suggestions & Culinary Pairings
A perfectly cooked piece of crispy beer battered halibut, cod, or chicken tender deserves equally delicious accompaniments.
*
Classic Fish and Chips: The quintessential pairing! Serve your beer-battered creations with a generous side of homemade beer batter fries. The double-fried crunch of the potatoes complements the delicate crispness of the fish perfectly.
*
Tangy Sauces:
*
Homemade Tartar Sauce: A creamy, tangy tartar sauce is non-negotiable for many. The cool, piquant flavor cuts through the richness of the fried food beautifully.
*
Creamy Dill Sauce: A fresh, herb-infused dill sauce offers a lighter, brighter alternative, particularly lovely with halibut.
*
Lemon Wedges: A simple squeeze of fresh lemon juice before serving provides a burst of acidity that awakens the flavors and brightens the entire dish.
*
Fresh Sides: Balance the richness with vibrant, fresh sides. A crisp coleslaw, a light green salad, or even a simple Raw Corn and Zucchini Salad can add textural contrast and a refreshing element to your meal.
*
Unexpected Delights: Don't overlook interesting culinary offshoots! If you're using whole fish, consider making crispy fish skin chips as an appetizer or garnish – a delightful, zero-waste treat mentioned in some culinary traditions.
Conclusion
Crafting crispy beer batter for halibut, cod, or chicken tenders at home is an incredibly rewarding culinary experience. By understanding the simple science behind the batter, meticulously preparing your chosen protein, and mastering the art of frying, you can achieve results that rival your favorite take-out. The satisfying crunch, the tender interior, and the rich flavor profile make this a truly unforgettable meal. So, gather your ingredients, follow these steps, and prepare to impress your family and friends with a homemade dish that exemplifies comfort food at its finest. Enjoy the process, savor the aroma, and delight in the irresistible taste of perfectly beer-battered perfection!