Achieve Perfect Beer Battered Halibut: From Dry Fish to Hot Oil
There’s something undeniably satisfying about a perfectly cooked piece of beer battered halibut. That delicate balance of tender, flaky white fish enveloped in a golden, impossibly crispy shell is a culinary delight, reminiscent of a gourmet fish and chips experience right in your own kitchen. While it might seem like a dish best left to restaurant chefs, achieving this crispy perfection at home is not only possible but surprisingly straightforward, provided you know the right techniques. Say goodbye to soggy coatings and hello to the ultimate homemade
Mastering Pan-Fried Beer Battered Halibut: Tips for Crispy Fish.
This comprehensive guide will walk you through every critical step, from preparing your halibut to mastering the batter consistency and achieving that ideal sizzle in the hot oil. We'll uncover the secrets to preventing a common pitfall – moisture – and ensure your batter adheres beautifully, delivering a truly unforgettable meal. Get ready to transform your dinner table with a dish that consistently delivers on crunch and flavor.
The Unbeatable Allure of Perfect Beer Battered Halibut
Imagine sinking your teeth into a piece of halibut so tender it practically melts, encased in a light, airy, and audibly crisp crust. That’s the magic of expertly prepared
beer battered halibut. It's a dish that captivates the senses, offering a delightful contrast in textures and a rich, savory flavor that makes it a perennial favorite. While halibut is often praised for its firm texture and mild, sweet taste, the beauty of this battering technique is its versatility. You can apply the very same principles to other beloved white fish varieties like cod, haddock, or even tilapia, allowing you to experiment and discover your own preferred seafood protein.
The allure isn't just in the taste; it's also in the creation. There's immense satisfaction in crafting such a restaurant-quality meal from scratch. The process itself, from selecting your fish to dipping it into that frothy, cold batter, builds anticipation for the delicious outcome. Whether you're aiming for a classic fish and chips experience paired with homemade fries or seeking a fresh main course, beer battered fish stands as a testament to simple ingredients coming together to create something truly extraordinary.
Mastering the Foundation: Prepping Your Halibut for Battering
The journey to perfect beer battered halibut begins long before the batter is mixed. The preparation of your fish is a foundational step that directly impacts the final texture and crispiness of your meal. Skipping these initial stages can lead to a less-than-ideal result, so pay close attention to the details.
Selecting and Thawing Your Halibut
Choosing quality fish is paramount. Opt for fresh halibut fillets when possible, looking for firm, translucent flesh with no strong odor. If using frozen halibut, proper thawing is critical to prevent waterlogging and ensure even cooking. The best method is to thaw your fillets slowly in the refrigerator overnight. Alternatively, for a quicker approach, place the fish in a sealed bag and submerge it in a bowl of cool (not warm) water for about an hour, changing the water every 30 minutes.
Never use hot water to thaw fish, as it can compromise texture and flavor.
The Critical Dry Fish Step: Your Secret Weapon
This is perhaps the single most important tip for achieving a crispy, adhering batter:
your fish must be absolutely dry. Any residual moisture on the surface of the halibut will create a barrier between the fish and the batter, preventing it from sticking properly. This leads to a greasy, sliding-off coating – the exact opposite of what we want.
To ensure your fillets are bone-dry, gently blot each piece thoroughly with paper towels. Press firmly but carefully to absorb as much surface moisture as possible. Repeat this process until the paper towels come away almost dry. This simple yet crucial step allows the batter to cling firmly to the fish, forming that desirable, crunchy shell.
Slicing and Portioning
Consider the thickness of your halibut fillets. Uniformly sliced pieces, typically around 1-inch thick, will cook more evenly. If your fillets are very thick, you might consider slicing them lengthwise to create more manageable, quicker-cooking portions. This also ensures a better fish-to-batter ratio in every bite.
Crafting the Crispy Shell: The Art of the Beer Batter
The batter is the heart of your beer battered halibut, responsible for that signature golden, crunchy crust. Crafting the perfect batter involves a careful balance of ingredients and technique.
Ingredients Breakdown for the Ideal Batter
*
The Flour Base: All-purpose flour forms the foundation of your batter, providing structure and crispiness.
*
Seasonings: Don't underestimate the power of seasoning the batter itself. A blend of salt, freshly ground black pepper, paprika (for color and subtle sweetness), and granulated garlic will elevate the flavor profile. These spices don't just add taste; they also contribute to the browning and overall crispness.
*
The Carbonated Liquid – Beer (or Alternatives): This is where the magic happens. The carbonation in beer creates tiny air pockets within the batter as it cooks, resulting in an incredibly light and airy texture. While beer adds a distinct, subtle malty flavor that complements the fish beautifully, you don't *have* to use alcohol. Any highly carbonated beverage will work – club soda or even sparkling water are excellent non-alcoholic alternatives that still deliver the crucial bubbles for lightness.
*
Temperature is Key: For the crispiest results, your chosen liquid must be
ice cold. The dramatic temperature difference between cold batter and hot oil creates a shock effect, helping the batter "set" quickly and preventing it from absorbing too much oil.
Achieving the Perfect Consistency
The ideal batter consistency is often described as resembling pancake batter – thick enough to coat the back of a spoon, but thin enough to flow smoothly.
*
For a Thicker, Puffier Coat: Start with slightly less liquid and add more gradually until you reach your desired consistency.
*
For a Lighter, Fluffier Coat: Incorporate a touch more liquid until the batter thins out slightly, allowing for a more delicate crust.
Remember, consistency can be a matter of personal preference, so don't be afraid to adjust. Mix the dry ingredients first, then gradually whisk in the cold liquid until just combined. A few lumps are perfectly fine; overmixing can develop the gluten in the flour, leading to a tougher batter.
Frying Fundamentals: From Cold Batter to Golden Perfection
With your halibut prepped and your batter ready, the final stage is frying. This step requires attention to detail, particularly regarding oil choice and temperature, to ensure your beer battered halibut turns out golden brown and irresistibly crispy.
Choosing the Right Oil
For frying, select a neutral-flavored oil with a high smoke point. Vegetable oil, canola oil, and peanut oil are excellent choices as they won't impart any unwanted flavors to your delicate halibut. Avoid olive oil, as its low smoke point and strong flavor are unsuitable for deep frying.
The Golden Rule: Oil Temperature Control
This is arguably the most critical factor for achieving perfectly crispy, non-greasy fried fish. The ideal temperature for frying beer battered halibut is typically between
350°F and 375°F (175°C - 190°C). Using a reliable thermometer is highly recommended.
*
Too Cold Oil: If the oil isn't hot enough, the batter will absorb excessive oil, resulting in a soggy, greasy crust.
*
Too Hot Oil: If the oil is too hot, the batter will burn on the outside before the fish cooks through, leaving you with raw fish and a bitter crust.
When the cold batter hits the hot oil, it should sizzle immediately and vigorously. This instantaneous reaction is what creates that light, airy texture. If it barely bubbles, your oil is too cold. If it splatters violently and smokes excessively, it's too hot. Adjust your heat accordingly. For more in-depth advice on achieving that perfect sizzle, refer to our guide on
Mastering Pan-Fried Beer Battered Halibut: Tips for Crispy Fish.
Frying Technique
1.
Dredge the Fish: Just before frying, dip each dry halibut fillet into the cold batter, ensuring it’s fully coated. Let any excess batter drip off.
2.
Carefully Place in Oil: Gently lower the battered fish into the hot oil, placing it away from you to avoid splashes.
3.
Don't Overcrowd: Fry in batches to maintain the oil temperature. Overcrowding the pan will cause the oil temperature to drop, leading to greasy fish.
4.
Cook Until Golden: Fry for approximately 3-5 minutes per side, depending on thickness, until the batter is a beautiful golden brown and the fish is cooked through and flakes easily.
5.
Drain Excess Oil: Once cooked, remove the fish with a slotted spoon or spider and place it on a wire rack set over paper towels. This allows excess oil to drain off, keeping your batter crisp.
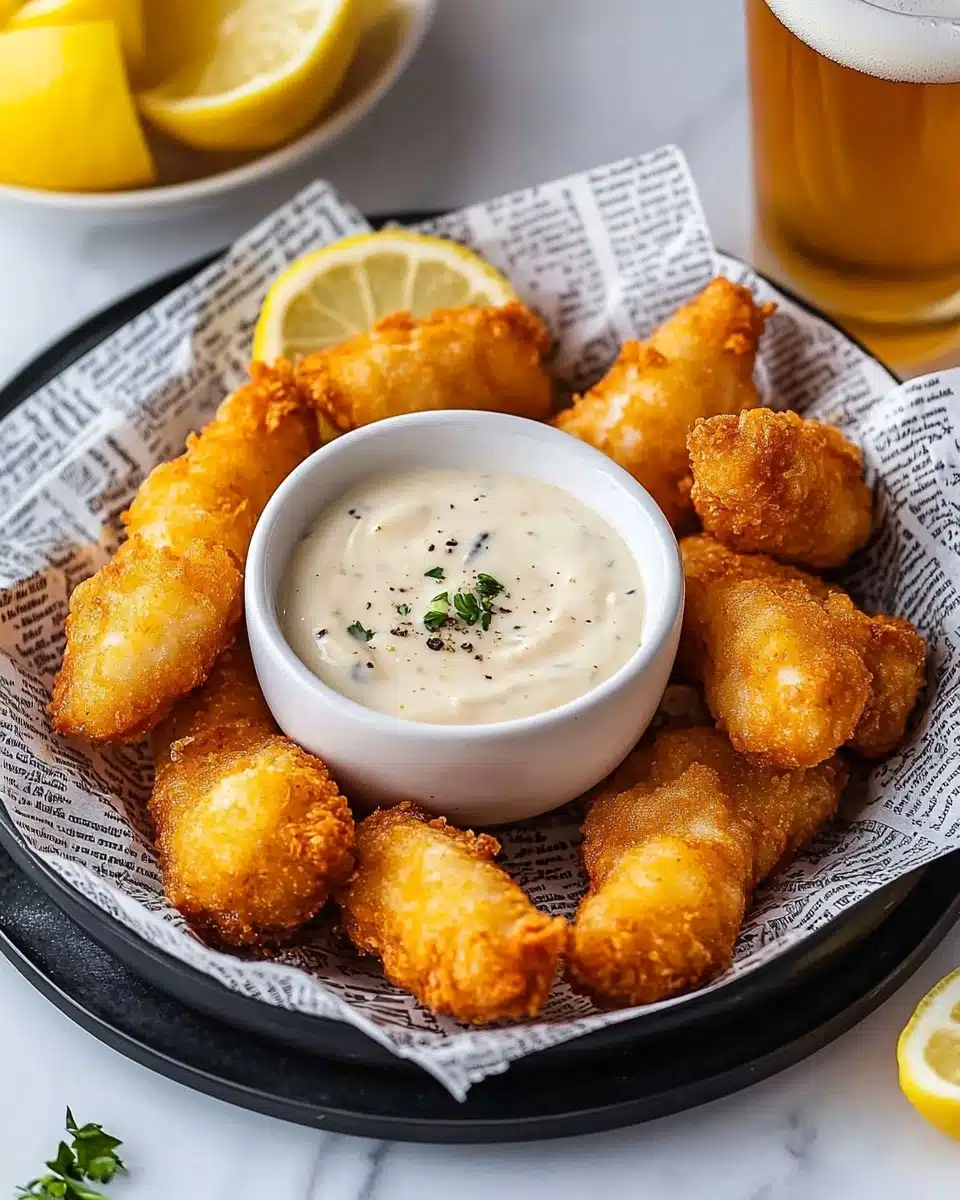
Serving Suggestions and Creative Twists
Once your beer battered halibut is perfectly golden and crispy, it's time to complete the meal with delicious accompaniments and consider some creative variations.
Classic Pairings
*
Tartar Sauce: A creamy, tangy homemade tartar sauce is the quintessential partner for fried fish. Its bright notes cut through the richness of the fried batter beautifully.
*
Lemon Wedges: A squeeze of fresh lemon juice adds a refreshing zest that brightens every bite.
*
Malt Vinegar: For those who love the traditional British "chippy" experience, a dash of malt vinegar is a must.
*
Homemade Fries: No discussion of beer battered fish is complete without mentioning crispy fries. Consider making your own beer batter fries for an ultimate fish and chips dinner.
Elevate Your Sides
Beyond fries, consider other sides that complement the dish:
*
Creamy Coleslaw: A cool, crunchy coleslaw offers a refreshing counterpoint.
*
Fresh Salad: A simple green salad or a vibrant corn and zucchini salad adds lightness.
Creative Culinary Adventures
The beauty of this beer batter technique extends beyond halibut. It's a remarkably versatile coating that can transform various proteins:
*
Fish Skin Chips: Don't discard the halibut skin! If you're using skin-on fillets and remove the skin, crisp it up in a hot pan or oven for a delightful, savory snack.
*
Other Seafood: Apply the same batter to shrimp, scallops, or calamari for quick-fried seafood treats.
*
Crispy Chicken Tenders: For the kids (or even adults!), this batter works wonders on chicken tenders, creating a familiar favorite with an irresistible crunch. Explore the possibilities further by reading our article on
Crispy Beer Batter: Halibut, Cod, or Chicken Tenders for Dinner.
*
Vegetable Tempura: Thinly sliced vegetables like onions, zucchini, or sweet potatoes also take wonderfully to this light, crispy batter.
Achieving perfect beer battered halibut is a rewarding culinary endeavor that brings restaurant-quality crispiness and flavor to your home kitchen. By focusing on critical steps like drying your fish thoroughly, using ice-cold carbonated liquid in your batter, and meticulously controlling your oil temperature, you'll overcome common challenges and consistently produce a dish that delights. So grab your ingredients, fire up your fryer, and prepare to impress yourself and your loved ones with the ultimate homemade crispy fish.